
I went in search of a light fixture. Something to replace the awesome ceiling fan we had in the master bedroom since it decided to crap-out on me. We don't have an extra couple hundred bucks to plop down on a pretty new light fixture. While I was searching the store for hidden treasure, I came across this awesomeness.

Aren't they pretty?!? And there are two of them. And they are the most precious shade of blue. I l.o.v.e. these lockers! But at $200 each, they are a bit out of my price-range. So, I continued my search for a light and I found this beauty.
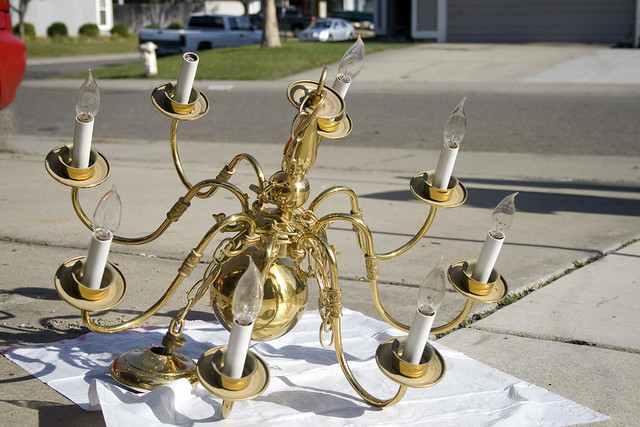
Ok, yeah, I know, its not really beautiful. But look at all that potential! No, seriously. Ok, well, I'm not a big fan of the 90s tract home brass either (in fact I removed it all from this home just 7 years ago). But, bear with me, it'll be awesome, I swear! All it needs is a little of my favorite thing - spray paint.
I started by cleaning it really well. Then I lightly sanded the whole thing with some fine-grit sandpaper. Next, I crumpled up little pieces of paper and shoved them (gently) in to the light-screwy parts. Finally, I grabbed a can of Rust-oleum's American Accents Aqua in Smooth Satin Finish {because it matches my gorgeous quilt (made with love by Leesy-Lou) featuring some beautiful Amy Butler fabric.}
I tested the spray on a different surface (the drop cloth would work) to make sure it was spraying well, and started in an inconspicuous area of the lamp to see how it held (the top of the chandelier, where the chord comes out and goes to the ceiling). I liked what I saw so I did the arms and small areas using short bursts and making sure to coat it lightly and evenly. For the larger portions (like the big ball on the bottom) I used longer bursts and even movements to ensure the same.
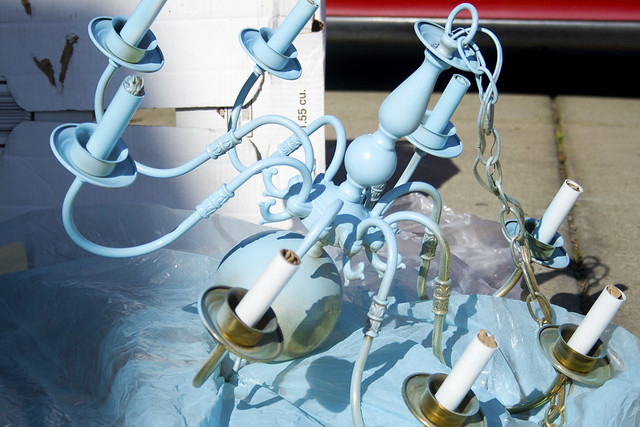 |
| About half-way through the first coat |
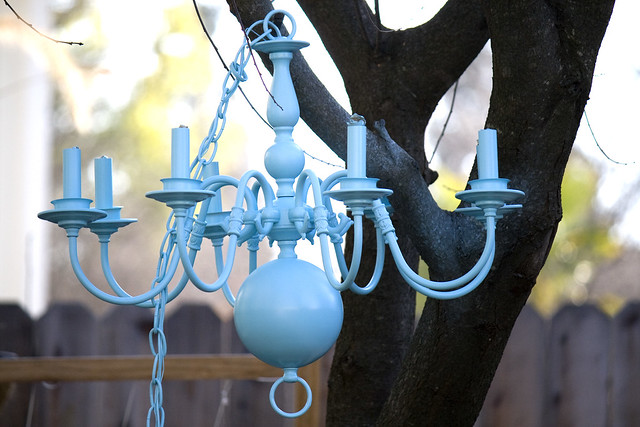
Here's what it looked like before installation. Just chilling outside getting its "dry" on.
The best part? All things told, this cost me exactly $21 and only took about an hour (plus installation time)!
{You'll have to wait for future posts to see it in all its glory because this beauty has inspired a little bedroom makeover - so stay tuned!}
6 comments:
Swoon! Can't wait to see it in the space
Oooh, that is pretty! I always worry about spray-painting, because sometimes it gets that funny texture? But this looks smooth and lovely. <3
That funny texture is usually caused by 1) a lack of priming - some surfaces NEED to be primed (but precious few in this lazy girl's experience) 2) a spray issue - why you should always, always test the spray before you start spraying your stuff 3) spraying too close - you should be at least 6-8 inches away, 4) spraying too heavy - things get funky if you try to do it all in one coat, keep the coats super thin and that shouldn't happen.
If you still get a funky texture. Let it dry over night, sand it with a really fine paper or block, then wipe with a damp cloth. Make sure its dry before you re-coat.
Remember, practice makes perfect!
PS: there are some funky parts on that lamp... but its hanging from the ceiling... I'm the only one who will ever know. You won't tell, will you? ;)
Me either! Or, rather, I can't wait until the space is finished. I'm tempted to kick Papa out to the couch, rent a paint sprayer and spend the night listening to it whur.
That is just awesome. It never occurs to me to spray paint anything...now I'm going to have to find something - anything! - to prettify.
Just found your blog while searching for Monday memes, and I love it - I'll be back to visit! :)
You're welcome to visit me too - http://junecleaverwouldbeshocked.blogspot.com
Thanks for visiting! Spray paint is awesome! Hope you find something old to fall in love with!
Post a Comment